Under-Sink Kitchen Organization Under $20
Under-sink chaos and summer humidity turning cleaners into a sticky mess? Build an under-sink kitchen organization system for under $20 that stays clean.
You open the cabinet under the kitchen sink and something tips over. A half-empty bottle of cleaner has leaked into a sticky puddle. The dish soap is somewhere behind the trash bags. A sponge that should have been thrown away weeks ago is still sitting in a damp corner. The whole space smells faintly chemical and musty at the same time.
This is the under-sink reality in most homes by mid-summer. Humidity seeps in, bottles sweat, labels peel, and the jumble of cleaning supplies multiplies. What started as a convenient storage spot turns into a frustrating, slightly grimy black hole.
You don’t need custom pull-out drawers or a $100 organization kit to fix it. A practical under-sink kitchen organization system built with a few cheap pieces can bring order, improve airflow, and survive humid weather for under $20. I’ve set this exact system up in dozens of kitchens. The families who keep it simple are the ones who still like opening that cabinet in August.
Once the sink cabinet is clean, apply the same zone logic to upper cabinets with our kitchen cabinet organization system. For pantry humidity and spoilage in heat, see Japandi pantry organization for hot weather. If sticky residue has spread to the floor, clear it with the 15-minute sticky floor summer reset.
Why Under-Sink Areas Get So Bad in Summer
The cabinet under the sink is already a tough environment—pipes, limited airflow, and temperature swings. Add summer humidity and it gets worse. Plastic bottles develop condensation. Cardboard boxes soften. Damp sponges and cloths turn sour. Leaks from cleaning products mix with that moisture and create sticky residue that attracts more dirt.
Most people respond by shoving more products in or ignoring it until something spills badly. The better approach is a system that contains leaks, lifts items off the cabinet floor, and makes every product visible and reachable.
The Under-$20 Under-Sink System
Here’s the exact setup that works in most standard base cabinets.
1. Lift Everything Off the Floor with a Tension Rod
This is the single best cheap upgrade for under-sink spaces.
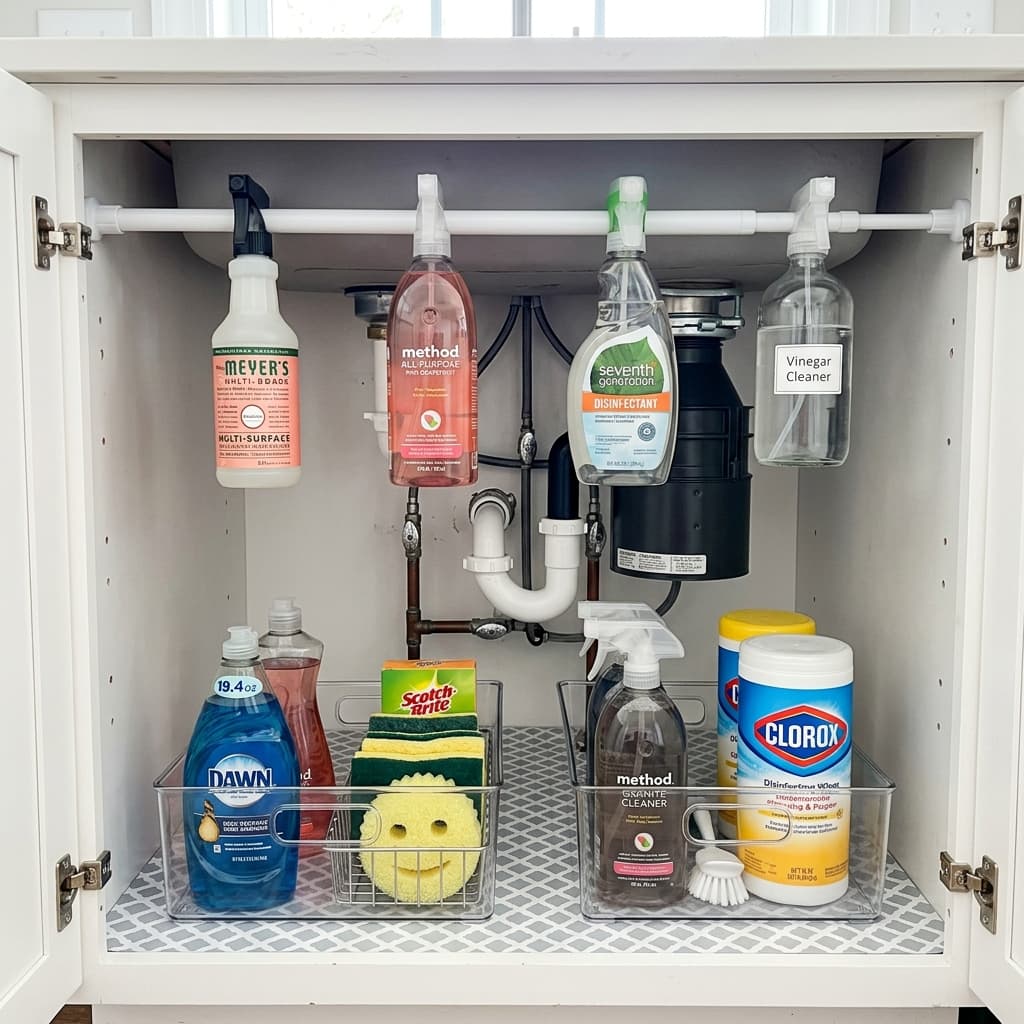
Install a spring-loaded tension rod near the top of the cabinet, just below the sink basin. Hang spray bottles from the rod by their triggers. This keeps the most-used cleaners off the floor, prevents them from tipping, and frees up the bottom of the cabinet.
A basic tension rod costs $4–$8. Measure the width of your cabinet before buying. This tension rod under-sink trick alone transforms the space.
2. Create Clear Zones on the Cabinet Floor
Once the spray bottles are hanging, divide the floor into simple zones using low bins or trays:
- Cleaning caddy zone: One bin for everyday cleaners, sponges, and dish soap
- Backup supplies zone: Extra trash bags, dishwasher packets, and refills
- Sink tools zone: Scrub brushes, gloves, and the plunger if you store it there
Use shallow plastic bins, baking sheets, or even sturdy cardboard trays lined with a plastic bag. The goal is containment. If something leaks, it stays in the bin instead of coating the cabinet floor.
3. Contain Moisture and Leaks
Humidity and small leaks are the main enemies.
Practical low-cost solutions:
- A waterproof liner or cut piece of vinyl shelf liner on the cabinet floor ($3–$6)
- Small plastic trays under any bottles that tend to drip
- An open box of baking soda or a charcoal odor bag in the back corner to absorb mustiness
- A tiny moisture absorber if your cabinet is especially damp
These pieces make under-sink storage far more humidity-resistant than stacking bottles directly on the cabinet floor.
4. The “Only What You Use” Edit
Before you put anything back, pull everything out and be honest. Toss empty bottles, dried-up sponges, and products you haven’t used in a year. Wipe the cabinet interior with a vinegar-water solution while it’s empty.
Most under-sink cabinets contain twice as many products as anyone actually needs. Reducing the volume makes the system work better and look cleaner.
Realistic $20 Shopping List
Here’s a typical total:
- Tension rod: $6
- Two shallow plastic bins or trays: $6–$8
- Shelf liner or waterproof mat: $4
- Baking soda or charcoal bag: $2–$3
Total usually lands between $15 and $20. If you already own bins or a tension rod, you can do it for almost nothing.
How to Set It Up Step by Step
- Empty the entire cabinet.
- Wipe shelves and walls with vinegar and water. Let it dry.
- Install the tension rod and hang spray bottles.
- Place the waterproof liner on the floor.
- Add the bins and assign zones.
- Put only the products you actually use back into the bins.
- Add the baking soda or moisture absorber in the back.
The whole process takes 20–30 minutes the first time. After that, maintenance is easy. Fold this into a broader 10-minute summer house reset if you want the whole kitchen to feel calmer in one pass.
Daily and Weekly Habits That Keep It Working
Daily: Put spray bottles back on the tension rod instead of setting them on the counter or floor.
Weekly:
- Quick check for leaks or sticky spots
- Empty and wipe the main cleaning caddy
- Replace any soaked sponges
Monthly:
- Replace the baking soda box
- Pull the bins out and wipe the cabinet floor
This light summer under-sink reset rhythm prevents the slow return of chaos.
Special Tips for Common Under-Sink Problems
- Pipes in the way: Use shorter bins and place them around the plumbing. The tension rod still works above the pipes.
- Narrow cabinet: Hang as many bottles as possible on the rod and use one narrow bin on the floor.
- Shared household: Label the bins so everyone knows where things belong. A piece of tape and a marker is enough.
- Renters: Tension rods and removable liners leave no damage.
If humidity is saturating the whole kitchen—not just this cabinet—address the root with why your house is so humid in summer.
Common Mistakes That Ruin Under-Sink Organization
- Keeping every half-empty bottle “just in case”
- Storing damp sponges and cloths in closed bins
- Ignoring small leaks until they become sticky messes
- Buying tall bins that don’t fit around the plumbing
- Putting the tension rod too low so bottles drag on the floor
Keep the system obvious and easy to maintain. Complicated setups get abandoned by week two.
A clean, functional under-sink cabinet makes the whole kitchen feel more under control. You stop wasting time hunting for the glass cleaner or wiping up mystery puddles. And because everything is contained and elevated, summer humidity does far less damage.
Frequently Asked Questions
What is the best under-sink organization method for humidity?
Elevate spray bottles on a tension rod, use waterproof liners and shallow bins to contain leaks, and add a moisture absorber or baking soda. This combination handles condensation and small spills better than stacking products directly on the cabinet floor.
Can I organize under the sink for under $20?
Yes. A tension rod, two basic bins, shelf liner, and baking soda are enough for most cabinets. You don’t need matching acrylic containers or pull-out systems to get real results.
How do I deal with the plumbing pipes?
Work around them. Use shorter bins placed on either side of the pipes and hang bottles from a tension rod above. Measure before you buy bins so nothing gets stuck.
How often should I clean under the sink in summer?
A full empty-and-wipe every 4–6 weeks is plenty if you do quick weekly checks. Humidity makes spills stickier, so wiping small messes as they happen keeps the job easy.
What should I do with sponges and dish cloths?
Don’t store damp ones under the sink. Keep only dry backups in a bin, and hang wet sponges or cloths to dry completely before putting them away. A sour sponge can make the whole cabinet smell.
Will a tension rod hold heavy spray bottles?
A good-quality spring tension rod handles normal cleaning bottles fine. If you have very large or heavy containers, limit how many you hang or choose a heavier-duty rod.
Related Guides & Reading
- Kitchen Cabinet Organization System
- Japandi Pantry Organization for Hot Weather
- 10-Minute Summer House Reset Clean (Cooler & Calmer)
- 15-Minute Sticky Floor & Musty Smell Summer Reset
- Why Is My House So Humid in Summer? 7 Fixes That Work
- 12-Minute Bathroom Humidity Reset (Stop Musty Mold)
The cabinet under the sink doesn’t have to be the most dreaded spot in your kitchen. A tension rod, a couple of bins, and a waterproof liner are enough to stop the tipping, leaking, and hunting.
Spend the $15–$20, empty the cabinet once, and set up the zones. The next time you reach for the all-purpose cleaner you’ll know exactly where it is—and you won’t have to wipe up a sticky mess first.
What’s the worst thing you’ve found under your kitchen sink lately? Tell me in the comments—I read them and I’m happy to help you adjust the system for your exact cabinet. You’ve got this.
Related Posts
More in Kitchen & Dining →
How to Clean Refrigerator Door Seals (Stop Mold & Sticky Residue)
Sticky fridge door seals or mold in the folds? Clean refrigerator door gaskets in 15 minutes: remove residue, cut mold risk, and restore a tight seal.
Stovetop Grease Reset with Baking Soda & Vinegar
Sticky summer grease on your stovetop? This baking soda and vinegar method loosens residue with almost no heavy scrubbing so your stove looks clean again fast.
Garbage Disposal Refresh with Ice, Salt & Citrus
Summer heat making your garbage disposal smell? This ice, salt, and citrus refresh stops odors and cleans the blades in minutes without harsh chemicals.